Quantcast
Channel: Adjusting Beauty
Viewing all 803 articles
Browse latest View live

Review: Bourjois Rouge Edition Velvet 04 Peach Club

$
0
0
Hey Beauties!

I think it was just the matter of time, when this will happen. Yep, I got another Bourjois Rouge Edition Velvet. I already reviewed 01 Personne ne rouge! Those matte liquid lipsticks got a lot of hype and praise in the blogger community. You may have already seen a lot of shades. The one that I decided to get, is 04 Peach Club and for some reason, I think it's not the most popular shade. But I really like it. 


It's pointless to do a long review, because I already explained it in the review of shade 01. The packaging is plastic lip gloss square bottle. It has regular doe foot applicator and it's travel friendly. You can see the actual shade through the transparent plastic.

The price is 13.99€ (did it go up, or does the price differ between shops?), but I bought it with a coupon for only 7€. You'll get 6.7 ml of product. 


Peach Club it's a coral shade, which tends to lean more toward orange or peach coral. Shade looks fairly different in the packaging. In the packaging it's very muted and fairly light, while on the hands it looked very bright and a lot darker. I've been wanting to get another shade for so long, but I always decided that there is no more me shades. I was wrong. This is so my kind of shade. My feeling is that this could look more pink based coral on cooler skin tones. On my skin it naturally gravitates to peach. 


On the contrary to 01 Personne ne rouge, this shade goes on evenly and dries that way too. Firstly, it's very creamy and has shine to it. After about 20 minutes, it dries to a perfect matte finish. No tightening, no heavy feeling and no cracks. Only even, weightless and matte finish. I'll say, if you're lips are very dry, you may feel a bit of dryness after long hours. Maybe put a light lip balm layer over it, if you dislike the feeling or are afraid of cracked lips. This is my never ending story with matte lipsticks. 

The formula makes for a very long lasting lipstick, but it won't survive eating. It has a very artificial unpleasant chemical smell, which fortunately doesn't stay and linger on the lips. It's just the application that it's, well, smelly. 


I think, we can all agree that this is definitely more my kind of shade and probably the most my kind of shade out of the whole range. I don't mind the classic red, but this is more my every day bright shade. 


Review: L'Oreal Infallible 24h - Matte Foundation (11 Vanilla)

$
0
0
Hey Beauties!

This foundation was all over YouTube and I admit I was very intrigued, when I saw other YouTube makeup gurus singing praises about it. Normally, L'Oreal is just not my cup of tea, when it comes to foundations, but the hype made me buy it, anyway.


Choosing the right shade only based on swatches on the internet, it's a whole other story. I decided to go for 11 Vanilla. Not knowing that they also have lighter shade 10 Porcelain. Mateja reviewed this shade, so go over to her blog, to see what she thinks about it. 

The foundation comes in a practical plastic squeeze tube. Rarely do you see these kind of foundation packaging. It's mostly fancy heavy glass bottles. In contrary to those, this is way more practical and travel friendly

It cost me 8.99€ and you get 35 ml of it. The prices are different in certain shops and countries. As far as I know, we still don't have this foundation in our country. I bought it on Feelunique. 


Here is the ingredients list. 


It has a very small hole, which makes for perfectly controlled amount. It also means you're not wasting product and you can use the tiniest amount possible. The foundation often stays in the cap, so it can get a bit dirty. As you may already see on my photo.


About the shade... Shade 11 Vanilla is pretty dark for something named Vanilla. It's actually the darkest foundation in my collection. It has that very obvious orange undertone, which all L'Oreal foundations seem to have. But it's in fact more pink toned. Definitely best suited for cool skin tones. For the love of makeup, L'Oreal please stop doing orange based foundation shades. I think we've all established that Oompa Loompas are not sexy. See this is why I hate L'Oreal foundations and stay away from them. When this oxidizes on my skin, it becomes even darker than it looks like in the beginning. The shade is just really off for my complexion and I am only able to wear it, when I am pretty tanned. Even then it totally miss matches my skin tone, because I get more of an olive undertone, when I am naturally tanned. 

I compared it to my other foundations. L'Oreal True Match in N1 Ivory has the same orange undertone to it, but it's in fact the lightest shade in my collection, although it does oxidizes a little. Bourjois Healthy Mix Foundation in 51 Light Vanilla is the most yellow toned and also pretty light. Catrice Nude Illusion in 010 Nude Ivory is a bit darker then other foundations, but not as nearly dark as Infallible. It's somewhat of a neutral undertone. Revlon Colorstay in 150 Buff is also fairly light (not as Borujois or True Match) and it has a slight yellow undertone. Actually the best undertone for olive skin tones. 

As you can see Infallible is clearly the darkest and gets the most orange after it oxidizes, which is seen in the photo below. 


It has a semi thick consistency. It feels thicker than an average runny foundation, but it spreads with an ease and it's not heavy at all. Application is very smooth. This foundation is matte, so it dries extremely quickly, a lot quicker than for example Revlon Colorstay foundation. You can't really apply it all over your face, because it will sink into the skin, leave you with patches, before you'll be able to spread it. That's why I like to apply it with fingers and quickly massage it on certain parts of the face, one by one. 

It leaves a perfect matte finish. This being said, I have to say that if you have dry skin, this might grab onto dry patches or make your skin look, well, a bit dead and dull. I find that using very moisturizing cream underneath helps me to still look fresh with that complete matte finish, plus it makes for a nicer application, since I can spread it better. Also, what I really don't like about this foundation is that it clings to any sort of hair. By that I mean brows and hair line. If you come too close to it, the foundation just grabs in between those hair and look very unattractive. Imagine how weird it looks when I try to avoid those areas, but the foundation is too dark for me, so I'm left with lighter patches around my face and brows. 

Mateja raves about how this foundation conceals and blurs her pores, however I didn't find that it did the same for me. It definitely gives of a blurred effect to the skin, which makes it look smoother, but my pores are still quit visible. Maybe it's just the fact that my pores around my nose and cheeks are just huge in general. 

For me the coverage is light to medium. It all depends on how much you apply on. Because this shade is too dark for me, I apply thin layer, therefore I get more of a light to medium coverage. If you'd go in with a thicker or two thin coats, you'd get medium coverage. But it's definitely not high coverage (that could only be said for Revlon Colorstay in my collection). Keep in mind that concealer will be a must for covering under eye circles, pimples or any red patches. 

The matte finish doesn't stay matte on me the whole day, because in spite of having fairly dry or dehydrated skin, I still produce a lot of oil through the day. Then foundations starts to get shinier and starts to wear off. But I would say that it lasts a pretty long time. Still nothing like Revlon Colorstay.

It doesn't have any particular scent, which I like. It's one of those typical clay foundation smells with no added perfumes. 

Finally here is how it looks like on me. On the right photo it's me with no foundation and on the left photo I used a thin layer of foundation. 


This is my skin with just this foundation. 


 And this is how it looks like when I apply powder over it, bronzer, highlighter and blush. 


I like the light feeling of this foundation and the perfect matte finish, which doesn't seems drying at all. But I hate this shade and I hate the fact that most of L'Oreal foundations have that ugly orange tone to it. I also dislike the fact that it catches to the hair. I actually even like the lighter coverage and would definitely love this foundation, if only there was the right shade available for me. For darker skin tones, this can be amazing, because I think the shade range is more suited to medium skin tones. 

Modern twist on a classic makeup look - Collaboration with Taya - My Little Beauty World

$
0
0
Hey Beauties!

Today I have a very exciting my first ever collaboration with none other than amazing Tatjana from Taya - My Little Beauty World blog. I'm sure most of you already know her. She is definitely the best Slovenian makeup looks inspiration. I find her daring and inspiring. She loves colorful makeup and has been getting more and more into artistic makeup, which inspires me to start doing more of artistic, less wearable makeup looks too. 


A few weeks ago, we finally got together for a drink and I have to say I feel like we are on the same mind level. She is very inspiring and will definitely make you want to wear more color. Recently, she made a post about how people should be more daring, when it comes to makeup. I completely agree with her. You can read it here. Tatjana you're awesome and I hope we get to do this again ;).

It was no-brainer, that we'd do a makeup look collaboration. When I got my new MAC Lady Danger lipstick, we decided it's going to be our mean feature of the makeup, since she also has it. We went for something classic, Hollywood inspired makeup and it turned out to be a modern twist on a classic makeup look. We both, unintentionally, did a cut crease makeup, fierce liner and bold orange red lip. It's more of a modern twist on a classic makeup look. 

I started my makeup look with eye primer. Then I used light matte brown shade and put it above my natural crease. Then I added dark matte chocolate brown in the crease and tried to define it a bit more. Ok, my cut crease is actually still very subtle. 


Then I added a mixture of shimmery peach and gold shade onto the entire lid. I wanted to still go fairly classic, but with a peach tone to it. Then I used the same matte chocolate brown shade and used it in the outer V, to connect it to the crease. Around my lower lash line, I also used light matte brown shade. 


Then I added matte chocolate brown shade only on the outer half. I used black gel eye liner and did a winged liner. After that I applied mascara and put on some natural, but long false lashes. I also added champagne highlighter in the inner corner of the eye.


The star of this makeup look is MAC lipstick in Lady Danger, which is a gorgeous matte orange toned red. I'll do a separate review soon. It's a modern twist on a classic blue toned red lipstick. It makes the whole look a bit more colorful and bright.


On my face, I used foundation with a good coverage.  I used concealer to cover my imperfection and powder to make my face less shiny. Then I used two bronzers, one matte and one shimmery with more of a peach undertone, to compliment the makeup. I also used a bit of light contour shade. Highlighter is a must have for me and I used a very shimmery champagne gold shade. For the blush I also went in the similar color palette, I used peach red blush. 


For a modern twist go with a sleek straight hair. 


But I was inspired by the old Hollywood style and decided to go for curls. It's a different classier approach, if that's what you like better.  


Check Tatjana's post. The lipstick actually looks a lot more orange on her. I'm sure you all know her blog, if not you should. Shame on you :P.


Face:
Revlon Colorstay foundation 150 Buff
Catrice Liquid Camouflage concealer 010 Porcellain
MAC Studio Finish concealer NC15
Catrice Camouflage Cream 020 Light Beige
Elf HD Powder Sheer
Makeup Revolution Ultra Sculpt&Contour Kit Ultra Fair C01
The Balm Betty-Lou Manizer
Catrice Prime and Fine Professional Contouring palette 010 Ashy Radiance
The Balm Mary-Lou Manizer
MAC Sheertone Blush Pinch Me

Eyes:
Avon Flawless Eye Primer Light Beige
Makeup Revolution Ultra Sculpt & Contour Kit Ultra Fair C01 (Bronzer)
Sleek Makeup I-Divine Ultra Matts V2 - Paper Bag
Makeup Revolution Salvation Palette Run Boy Run - Don't Have to Hide Away
MUA Undressed palette - Shade 6
Catrice Gel Eye Liner 010 Black Jack With Jack Black
Maybelline Lash Sensational Lash Multiplying maskara - Black
Born Pretty Store Lashes
Artdeco Adhesive for Lashes and Sparkles

Lips:
MAC Matte lipstick Lady Danger

Preview of Essence LE Merry Berry

$
0
0
Hey Beauties!

This is a first. I never make a post about Essence and Catrice Limited Editions, because I just never found any that I would be really interested in. This is the first one, that I though, I really need to get some of these products. Wishful thinking, since LE gets sold out really quickly.


Merry Berry is obviously Christmas inspired collection. It will be available from November to December in all the stores that usually carry Essence makeup. 


Two eyeshadows in purple and copper shade. The shades are called 01 The Perfect Dress and 02 The Masked Ball. The price is 2.19€.


Highlighting powder it's suppose to give you gorgeous gold glow. It comes in a shade 01 I Love My Golden Pumps. The price is 3.59€


Three lipsticks with different finishes. The purple ones give you shine and the red is matte. Available in shades 01 Let's The Berry-tales Begin, 02 Pink&Perfect and 03 Red Rocks. The price is 2.49€


Gift worthy packaging of those cute nail polishes with gold top, four shades and one top coat with gold particles. They come in shades 01 The Masked Ball, 02 Purple With Purpose, 03 Pink&Perfect, 04 Red Rocks and 01 I Love My Golden Pumps. Price for colored nail polishes it's 1.49€ and for glitter top coat it's 2.19€.


Limited Edition also has a hair fragrance and scented gold dust powder. Hair fragrance 01 I Love My Golden Pumps, gives your hair gold dust and it smells of fragrance "Like The Party Of My Life". The price is 3.79€. Scented gold dust powder in 01 I Love My Golden Pumps, also has gold glitter, which is slightly scented. The bottle is one of those vintage perfume bottles. The price is 3.79€.

Since Essence LE Metal Glam, I was hoping that Essence would came out with another amazing holy grail drugstore highlighter and for some reason I have high hopes for this one. I really hope, I can get my hands on it. Matte red lipstick seems very pretty and I would love to try Essence matte lipstick, because they usually make pretty good formulations for LE products. Nail polishes are too cute to handle. I want them all, but especially the gold particle top coat. I have a feeling it'll be similar to the one from LE Metal Glam, which everyone has, except me (sad face). I also love the packaging of the scented gold dust powder, although I'm not sure if I would like the glitter all over me. I would probably just look at it :).

So, let me know, what are you most excited about in this LE?

My Favorite Fall/Autumn Makeup and Nail Polishes

$
0
0
Hey Beauties!

Fall is my favorite makeup season, if that's even a thing. Falling leaves, grapes, chestnuts, apples it all creates my favorite shades. When I think of fall, I think of purple, red, brown and green. It's the season of darker colors, smoky eyes and vampy lips. On that note, I wanted to share few of my favorite makeup and nail polishes for this season. 


Eyeshadow

Fall is the one season, when I feel like I can wear burgundy, cranberry, dark plums and not get weird looks. It just reflects the shades in the nature and potentially also shade ranges of clothing shops. I also love my neutral dark browns. Teals and greens are as well more suited for this time of year. 

I Heart Makeup Naked Chocolate Palette (review)

This palette has a very nice mix of shimmery and matte shades. It mostly has browns, coppers, taupes and even some dark matte burgundy shade. All in all, the darker shades are perfect for fall makeup. 


I especially like Sweet Shop, Suger and Choc-fest.


Makeup Revolution Ultra Professional Eyeshadow Flawless Palette (review)

Another great, if not my favorite, eyeshadow palette. It also has a mix of shimmery and matte shades, of which a lot are darker and in the fall shade range. 


My favorite shades have to be the two cranberry reds, Red Night and Burgandy Nights. 


Sleek I-Divine Ultra Matts V2

I still haven't made a review of this palette. Reason being, that I bought it in the summer and I still didn't have a chance to properly test out all the shades. This is a matte heaven of dark shades, very appropriate for the fall time. 


Avon True Color Eyeshadow Quad Palettes


Precious Shells (review)

Teal brown inspired palette, which has one of the most unique duo chrome eyeshadow. It can be build up to an intense mix of brown and teal and it looks very fall like to me.


Smoky Plums (review)

My current most used fall eyeshadow palette. It has mostly matte purple based shades, which will compliment any brown or plum lipstick. 


Purple Haze (review)

Again one of those palettes, that really gets more attention in this time of year. I love it for this one shade 3, which is the most gorgeous purple ever. For those of you on the cool skin tone side, you'll love the shade 4, blueish silver.


Single Eyeshadows

I mostly own eyeshadow palettes, because I get a wide range of shades in one product. Despite that, I do have some single eyeshadow in my collection, which I like to bring to the front row for each season. 


From left to right

L'Oreal Color Infallible eyeshadow in 024 Bronze Goddess (review) - gorgeous gold based light green.
Catrice Absolute Eye Colour 640 Don't Touch My Mosserati! (used here) - best shimmery moss green.
Essence LE Cookies&Cream eyeshadow 03 Last Night a Cookie Saved My Life! (review) - red based matte.
Elf Single Eyeshadow  Raspberry Truffle - also red based slightly shimmery brown.


From left to right

Kiko Long Lasting Stick Eyeshadow 37 Burgundy - burgundy cream eyeshadow with purple sheen.
Maybelline Color Tattoo 24hr Gel-Cream Eyeshadow 70 metallic Pomegranate (review) - shimmery brownish burgundy cream eyeshadow. 


Eyeliners

Eye pencils can be a great way of adding color to your makeup and I have for you some great shades.


From left to right

Avon Khol Eye Liner Sea Green (review) - dark moss green.
Avon Khol Eye Liner Deep Violet (review) - matte dark purple.
Avon Khol Eye Liner Bronze Sheen (review) - bronze brown.
Avon Super Shock Gel Eyeliner Blackberry (review) - purple based brown.
Essence LE Hello Autumn Eye Pencil 01 Leaves Are The New Beef (review) - light warm brown.


Blushes

Even I like to opt for mauve and purple based blushes in the fall time. I still haven't found the right mauve shade, that would knock my socks off, but I do have some good shades. 


From left to right

Essence LE Happy Girls Are Pretty Multi Colour Blush 01 You Sweeten My Day! - interesting mauve based light pink. The highlighting shade around the heart makes the blush lighter and pinkier.
Catrice Illuminating Blush 010 I Am Nuts About You - light mauve shade.
MAC Sheertone Blush Pinch Me - mix of light orange and dusty rose matte shade.


Lip liners

For the lips my choice is either dark red, plum or brown. Brown shades tame down colorful eye looks and reds/plums help elevate the whole makeup look and make it edgier. 


From left to right

Essence Lipliner 06 Satin Mauve - dirty mauve.
Catrice Long Lasting Lip Pencil 030 Berryson Ford (review) - deep berry shade.
Catrice Long Lasting Lip Pencil 040...And The Cherry On The Top (review) - dark red.
Essence Lipliner 11 In The Nude - peach based brown.


From left to right

Avon 3D Plumping Lipstick Mad For Mauve (review) - grey based light mauve.
Avon 3D Plumping Lipstick Uptown Pink (review) - dirty medium pink.
Avon 3D Plumping Lipstick Berry Cute (review) - berry purple.
Avon 3D Plumping Lipstick Divine Wine (review) - brownish dirty pink.
Avon 3D Plumping Lipstick Cantaloupe (review) - brownish light orange.
Avon 3D Plumping Lipstick Twig (review) - medium brown.
MAC Matte Lipstick Velvet Teddy (review) - orange based brown.
Revlon Colorburst Lip Butter 096 Macaroon (review) - sheer berry shade.
Bourjois Rouge Edition 12 Hours Lipstick 33 (review) - dirty red pink.
NYX Matte Lipstick Alabama (review) - orange based dark red.
Essence Liquid Lipstick 02 Make a Statement (review) - cherry red.


Nail Polishes

My favorite nail polish shades for fall are purple, reds, browns, greens and of course black.

From left to right

Models Own Disco Pants Roxy (review) - dark purple with blue sheen.
Calvin Klein Splendid Colour Garnet - blue based purple.
Maybelline Color Show 104 Noite De Gal - dark warm purple.
Kiko Quick Dry 829 (review) - very dark purple, almost black.


From left to right

Revlon 620 Bewetching - pink red.
Maybelline Colorama 15 - classic bright red.
Maybelline Color Show 465 Brick Shimmer - copper bronze.
Maybelline Colorama 261 (review) - very dark burgundy, almost black.


From left to right

Maybelline Color Show 549 Midnight Taupe (review) - taupe.
Kiko Nail Lacquer 322 Caffe Latte (review) - light brown.
Maybelline Colorama 269 - forest green.
Maybelline Color Show 677 Blackout (review) - black.


These are some of my favorite fall inspired makeup products and nail polishes. What are your absolute favorite shades for the fall season?

Review: L'Occitane 5% Shea Cleansing Oil

$
0
0
Hey Beauties!

I've been testing this baby for about 4 month. Reason being, I don't use this every day, just on special occasions, when my facade is really thick and it's been a long day. I had an amazing beauty blogger experience at L'Occitane store (thumbs up for a sales person, who still remembers me, when I come in the store) and I was determent to finally buy one of their products. It's their best seller 5% Shea Cleansing Oil. It's my first such cleansing oil, since I've only been using cleansing milks and gels before. 


It comes in a simple plastic transparent bottle with a pump. The cleansing oil is described as silky texture, which efficiently removes impurities and makeup in one single step. It also removes waterproof makeup. It is enriched with shea oil (5%) and it transforms into a soft emulsion, when it comes in contact with water. It should preserve skin's hydration, leave behind clean and comfortable skin. The complexion is suppose to look fresh and radiant

It costs 19.30€ and you get 200 ml of it. You can buy it online or in one of their shops.


The pump is big and plastic. It produces nice amount of product and one pump is enough, but I like to use one and a half for when I have a lot of makeup on. 


The texture is a lightweight oil. It's very oily (doh!) and it massages nicely onto face, although you may need to really work it in. I personally love that feeling of oil on my face. For some reason it just feels comforting and relaxing. 

It breaks down any makeup by just massaging it on your face. Waterproof makeup is also very easy to remove. You look like a panda, once you're done with massaging, but it does break down every little bit of it. 

Then I add water to it and it starts to get more milky and produces a slight white leather. You can remove it with just water, but I prefer to use muslin cloth with it. If you remove it only with water, you'll be left with a bit of that oily residue on your skin. Muslin cloth takes most of it off, but the skin is in no way striped of hydration. It actually feels soft and still plump. No tightening or irritation


I use this as my first cleanse and then I use another milk cleanser to get rid of that oil residue, because, I once had a breakout and I'm still not sure if it was because of this cleansing oil or something else. Just in case, I like to wash it off, but you can obviously leave it on, since it does have a quit hydrating and softening effect.

Because this is an oil, it may come into your eyes, which results in a blurry vision for a while, until your eyes get back to normal. So I feel, like this is best to use in the evening and I find it best for removing makeup, not for an everyday cleanse. Because of the oils, I would suggest you to get a sample first, if your skin tends to break out by such ingredients. 

Oh, the smell of it. It smells like a soft nutty scent. It's very comforting and still subtle in a way. I think the scent makes it even more enjoyable to use.

This oil definitely met my expectations and I am almost certain, I'm gonna be repurchasing it, once I us it up. This is also one benefit of it, you get a lot of product. I have been using it for a while and I used up less then a quarter of it. This justifies the price for me, because I don't use it daily. I think this is amazing cleansing oil for anyone that wants to quickly remove full face of makeup. It is also good for dry skins, because it can add one hydrating layer in your skin step routine. It's also a natural brand, so it might be amazing for all of those with irritations and sensitive skin. The scent is incredible. If you're on a market for cleansing oils or you've never tried any, this would be a good starting point. 

Review: MAC Matte lipstick - Lady Danger

$
0
0
Hey Beauties!

If there's one MAC product that I think it's worth the money, it has to be their lipsticks. Saying that I need to warn you that I don't actually own a lot of MAC products (one blush and lipsticks), but the lipsticks made me a fan.

I have already three of more neutral shades, but I knew I wanted a classic me-kind-of red. So I googled and decided on Lady Danger


MAC lipsticks always come in their matte black packaging with silver shimmer. They have a rounded top. The packaging is well made and secure.

It costs differently from country to country. We still don’t have MAC in our country, so mine came straight from Florida Palm Beach. I had the best boss, who actually got it for me on a trip to USA. There it costs 18,02$, but in Europe it’s around 20€. You'll get 3 grams of lipstick.


Lady Danger is orange based red. Not your typical blue toned red, but a lot warmer and bolder version. I think this shade is perfect for my warm skin tone. Orange is one of my favorite shades anyway, and this one just looks like a normal red on me.

The finish is matte, which means it really is matte. It’s highly pigmented and one swipe is enough to cover everything. It's also very long lasting. Because of the finish, it’s not going to be best for dry lips. However, it also doesn’t dry out yours lips. That is the one positive note about MAC lipsticks. They never dry out your lips and feel very comfortable to wear. 


Since this is a very unique red, I compared it with some other lipsticks in my stash and I didn’t actually found a dupe, which means yay for me.

MAC Lady Danger is orange based red with matte finish. IQ Cosmetics Matt lipstick in Summer is also matte, but lighter than MAC and a bit more peach toned. Born Pretty Store Rhombus lipstick in 109 is quite similar to Lady Danger, but it’s a tad redder and has a shiny finish. Avon Color Burst lipstick in Coral Burst is very similar in the shade, but a tiny bit more orange. The finish is also very shiny. Bourjois Rouge Edition Velvetin 04 Peach Club is the most pink toned and a lot lighter in shade, although it is also matte.  

In terms of the shade, Avon Color Burst in Coral Burst is the closest. In terms of the matte finish and formula, IQ Cosmetics Matt in Summer is the closest to Lady Danger. 


I am very pleased with my new edition to the MAC lipsticks. It makes my collection a bit bolder. I currently own MAC Lustrein High Tea, MAC Luster in Patisserie, MAC Matte in Velvet Teddy and MAC Matte in Lady Danger. I feel like I covered my basis. My wish list doesn't end here, but it’s reserved for when I’ll have a more stable income and will be able to afford more of their lipsticks. 


This is how it looks like on me. It doesn't even look like an orange red, it just looks like red on me. Perfect match in my eyes. If you haven't already seen it in action, you can see it here, where I did collaboration with Tatjana from Taya My Little Beauty World. We did a modern twist on a classic makeup look. 

Which MAC lipstick shades are on your wish list?


Blue sweater nails

$
0
0
Hey Beauties!

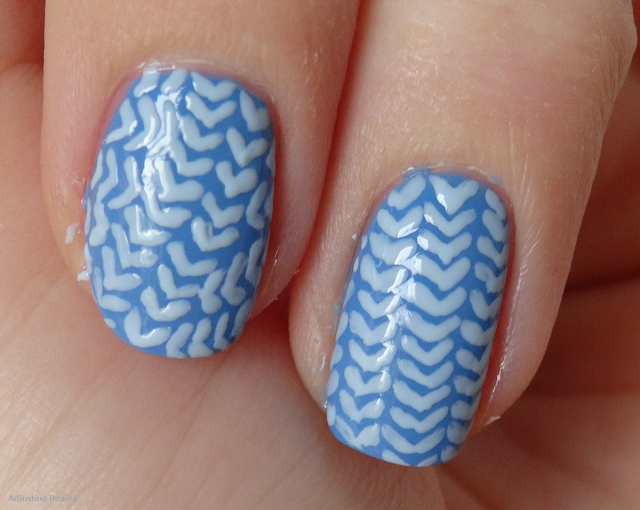
Sweater weather is here and autumn inspiration has been hitting me from all sides. A few days ago I got stud set, that I ordered from Born Pretty Store and I felt the urge to do some manicure. Sweater nails on Pinterest sparked my interest (look at me rhyming), so here it is.  


For the blue base I used one of my current favorite blues, Maybelline Color Show 286 Maybe Blue. 


Then I used striping brush and light blue shade of nail polish - Models Own Hyper Gel in Powder Blue. I drew on V like shapes. I think this is best if you start from the top and then just go down in the same pattern. Here I'm showing you how I curved this sweater design. 


It also looks really pretty, if you do it in straight lines. Of course my nail art is always a bit messy, but I don't mind it. I think you can also get stamping plates with this design, if you're more of a perfectionist.  


Here is what sweater design I tried to mimic. I hope this is clear from the photo. 


Inspired by the Essence LE Happy Girls Are Pretty blush, I also decided to add gold heart studs. The review of this blush will be up soon and you'll know what I'm talking about. Other three nails I left blue and added small gold rounded stud. 

I sealed in the design with my favorite Seche Vite Top Coat. Cute and fairly easy autumn design.

How do you like this manicure?


Review: Essence LE Happy Girls Are Pretty blush (01 You Sweeten My Day!)

$
0
0
Hey Beauties!

It's been a while since I bought something just because of the looks. This blush from Essence Limited Edition Happy Girls Are Pretty, just won me over with the cute autumnal design. It looks like a sweater pattern with heart in the middle. Yes, the concept is similar to Charlotte Tilbury blush designs, but it’s also not even close to being the same. Essence is one of those companies that lure you in their products with their cute designs. Some of the products from limited edition are in fact winner, but some are not worth the money.


The packaging is plastic and transparent, to let design be the star of it. It's not the most sturdy, but it'll do. The price is 2.95€ and you get 9 grams


The blush is called 01 You sweeten my day! As I said the sweater design with heart in the middle is really cute. Sweater pattern is light pink, while the heart is more of a deeper pink. Sweater shade to me looks like a highlighter, but it actually gives a lighter sense to the whole blush. Heart is obviously darker and has most of pigmentation. 

Pigmentation seemed horrible in the beginning, because the upper layer was so hard, but it actually becomes softer and gives some color. Saying that, it is still very light shade in general and it’s definitely not strongly pigmented.  You need to build it up quite a lot to get it noticed. I’m sure this will be a problem for a lot of people.


The shade of heartis my favorite, since it’s like a dirty pink. It is warm toned (has slight peach undertone on me), very light and sheer, but it has a bit of warmer sheento it. No visible shimmer. The shade around the heart, which to me looks like a sweater pattern, is more like a highlighter. It's very light almost white cool pink, which has a feel of lavender shade to it. It is cool toned and also has that sheen to it. When you mix together both shades, you get cool toned light slightly dirty rose shade. The shade is lighter than the heart shade and darker than the shade around the heart. It also seems like a bit of a mix of cool and warm, though I think it looks more cool than warm.

I personally prefer the heart shade, because it's just such a pretty fall take on a dirty pink. I also like that it's warm toned. Sometimes I mix both shades together, but always spend more time in the hart design, which makes the blush still warmer, but a tad lighter.

I also like the fact that the blush is initially matte, but has that pretty sheen to it, which doesn't involve any kind of shimmer.

First is the shade of heart, then it's the shade of sweater design around it and the last  are both shades mixed together. It's supposed to be a multi-color blush.


As you can see, the blush is really subtle. I put on a lot of product, but it still seems very light. 


I compared it with some of my blushes. Happy Girls Are Pretty is the sheerest and lightest of them all. It’s like a dirty rose shade. Catrice Illuminating Blush in 010 I Am Nuts About You is brownish dirty mauve. It's the darkest of these shades and has the same matte, but sheer finish as the Essence. Maybelline Colorama blush in 101 is peach based pink with gold shimmer. It's as sheer as Essence, but the peachiest of them all. Artdeco Mineral Blusher in 24 Pink is the most classic pink with cool sheen to it. It's the shiniest of them all.


Design made me buy it and I can’t decide if it was worth it or not. Obviously it’s really pretty, but the product itself left me wanting more. The pigmentation is the biggest disappointment. I like the shade a lot and especially the fact that it gives such a nice sheen to it, without being shimmery. But it would be nicer, if it would also be pigmented enough. I also don’t really care about the sweater shade around the heart. It just makes blush cooler, which doesn’t suit my skin tone, anyway. If the heart shade would be on its own, it would definitely get me more excited.

Not bad, but also not good. It’s average blush (if not under average, because of the pigmentation) with a very pretty design. If you like the shade and pretty design go for it. But if you want something pigmented, which you can put on with one swipe, it’s not for you. 

Mateja from Mateja's Beauty Blog also reviewed this blush here.

10 Products Worth the Hype - Collaboratin with Mateja from Mateja's Beauty Blog

$
0
0
Hey Beauties!

Today’s post is collaboration with the one and only Mateja from Mateja’s Beauty Blog.  I’m almost certain you all know of her or have heard of her.  She is like a Queen B of our beauty blog community in Slovenia and yes she is my favorite beauty blogger. So this is an honor, especially because she said to me, that this is her first collaboration (woop woop!). If you’re looking for detailed and useful reviews, you should be reading her blog. Her reviews also include a lot of comparisons and yes people, you can see the swatches on her face (I’m sorry I just need to point that out, since this suddenly doesn’t seem to be the norm anymore).  She is fair beauty with the love of lipsticks and the most amazing curly long hair. She’s also one of the rare beauty bloggers that posts a lot of hair product reviews.


We decided that we’ll show you what our 10 products worth the hype are. By that we meant products that were hyped up in the beauty community and we think that they are worth the money. Although I have a feeling we both included some products that we hyped up. I know I did. 


Bioderma Sensibio H20 Makeup-up Removing Micelle Water


This is backstage favorite of a lot of makeup artist and bloggers. It’s one of those products that you love, but are not quite sure why, but you also miss it, when you don’t have it. It’s micellar water, which removes your makeup. The formula is liquid and seems more like water, but does the magic. Makeup is gone and it doesn’t irritate your skin. It has no fragrance and is one of the most sensitive friendly products. I will say that waterproof makeup can sometimes be a problem to remove, but I don’t use waterproof products anyway. No other micellar water can compare to this one, because none are as effective and sensitive as this one. (review)


Revlon Colorstay Foundation

This was sure to be on my list. It’s my favorite and probably forever repurchased foundation and I am not the only one loving it. The consistency is thicker. It has natural clay based smell and most importantly, covers everything. It’s the foundation with most coverage in my collection. But what I like the most about it, it’s the fact that it’s a drugstore product and it costs like most other drugstore foundations. It also lasts on your skin for the longest time possible. Sometimes it’s even hard to remove it. It’s seriously the best drugstore medium to full coverage foundation.  It has one flaw, which is the lack of pump. I mean, I’ve heard this so many times, but Revlon still didn’t repackage it. But I can live with that, since the product is amazing. 

I have prepared a proper review of it, so keep any eye for this in the future. 


Rimmel Stay Matte Long Lasting Pressed Powder

Another drugstore gem, that is cheap, but effective. It’s a regular pressed powder, which keeps my skin matte for the longest time. Other powders tend to let oil get through faster, but this one keeps skin matte for a really long time. I buy it in transparent shade, which is great for my fair skin. It still gives me some color, which I like. No cakiness or weird getting into lines or anything else. It’s very basic, but highly needed product in my beauty stash. 


The Balm Mary Lou-Manizer aka The Luminizer

If there’s one thing you should know about me, it’s the fact that I love highlighters. In fact I have a pretty good collection of them, but none impressed me as much as this one. It’s one of the most amazing gold based champagne light colors, which looks so shiny, but in a good way. The shimmer is just big enough to get you the shine, but small enough to not make you look like a disco ball. Saying that, you should know that this will be a very obvious highlight, which I absolutely love, but it may not be for everyone. The shade is so neutral, that will look good on cool tones as well as on warm tones. I hope this will last me a long time, because I will definitely be repurchasing it. It’s worth every penny. (review)


Milani Baked Blush in 05 Luminoso

The writing has completely rubbed off, that’s how much it’s been loved. I can’t speak for other shades of Milani blush, but I can speak for 05 Luminoso. It’s one of the most perfect peach blushes with gold sheen. The pigmentation is amazing, shimmer is just small enough and because of it, it gives you the most flattering glowy, but natural cheeks. The shade instantly makes you look fresh and healthy. I think this is one of the most flattering blushes for every skin tone (excluding the really dark skin tones). It’s my go to blush, since it just looks so effortless and pretty. (review)


MAC Lipsticks

I haven’t tried many MAC products, but if there’s one type of product that it’s the most hyped about and that I like the most, it must be their lipsticks. I only have four shades, but love them all. MAC has so many finishes and shades, that there’s a shade for literally every skin tone possible. I mostly have Luster and Matte finishes. If you’re one of those people with very chapped and dry lips, you’ll appreciate good lipstick formula. MAC lipsticks, at least the ones that I have, all have good pigmentation and non-irritating, non-drying formula. I’ve hear that some matte shades, can be drying (Mateja says it’s the Ruby Woo), so maybe be careful with this formula and try the testers first. The price is definitely on a higher end, but if you’ll be wearing it a lot, better to invest in a good formula, than risk chapped lips that you can’t get rid of for weeks. 


I have two lustre finish lipsticks – High Tea and Patisserie and two matte finish lipsticks – Velvet Teddy and Lady Danger. If there’s one popular neutral shade, that looks good on most skin tones, it has to be Patisserie. 


Avon 3D Plumping Lipsticks

Ok, so this is not a hyped up product in theory, at least I find it so, but it should be. I need to point out that in other countries it’s called Beyond Color, but I can’t speak for the formula of those, since I’m not sure if it is the same. Again speaking to all of those with dry, often chapped lips, this is magic for you. It’s also a lot more budget friendly. Those lipsticks have very pigmented, a bit shiny and fairly long lasting formula. The formula has some amazing skin care beneficial ingredients, which actually help to improve your lips, while you’re wear it. It also has a bit of plumping effect. I’ve been wearing them a lot, so I can finally say that those are the only lipsticks that I wear with no problem and after I take them off, my lips feel like I’ve been wearing nourishing lip balm. I am not exaggerating.  It seriously is one of the best lipstick formula for dry lips. (review)


Zoeva Brushes

I have mixed feelings about this brand. Let me say, that they have one of the most amazing affordable brushes. I have one basic eye set and one face brush. As far as the eye brushes goes, it depends from a brush to brush. In general I find that those with white bristles are extremely soft and good quality. Some with black bristles are scratchy and not worth it. I only put on the photo those that I like. I have a lot of brushes, but Zoeva has one of the softest and most well-made brushes. Before this brand exceeded on social media platforms and before those brushes became so hyped up, the prices were lower. I just have to point that out. I also feel like every collection is pricier, but that’s just my opinion. You can’t raise the price for product, if you haven’t changed anything about it. Just sayin. But the quality of brushes is amazing. 

Reviews here, here and here.


If there’s one eye brush that everyone should have it's a blending brush and it's their 227 Soft Definer, which is amazing. It should be (softer) dupe for MAC 217. 


Seche Vite Dry Fast Top Coat

This one is again one of cult products. Once you go Seche Vite, you never go back. It’s a fast drying top coat and man is that true. This is one of the fastest drying top coats ever. It literally dries your nail polish in about a minute. You can go pee and do whatever it is that you need to do. No more waiting and no more imprints on your nail polish, when you go to sleep. It’s also amazing for nail art, since it doesn’t smudge the design at all. It’s thick and covers your nail perfectly. It makes your nails very shiny and prolongs the wear of your nail polish for a really long time. I haven’t found a better top coat yet. It has one flaw. It starts to get thicker once you come to about half. No biggie, you just need to buy their thinner or just a regular 100% acetone and it will make it thin and as new again. You need to do this, because if not, the nail polish will shrink your nail polish underneath it. But I find that this only happens when the nail polish gets thicker, otherwise it works fine. (review)


Batiste Dry Shampoo

If you have oily roots and dry ends like me, you need dry shampoo for those in-between washing days.  This is also a must have product, if you work out and you get oilier roots from that. I haven’t tried a lot of dry shampoos, but as soon as I tried Batiste, this was it. It’s obvious from my photo, that I’ve been repurchasing it a lot. My favorite scent is Tropical, because it smells like coconut. They also have some really cute mini travel shampoos. The shampoo is white and it will gives you some residue (unless you use colored ones), but why I like it so much, is that it really takes out all the grease. My hair instantly looks fresher and non-greasy. I also find that non-greasy moment lasts for a whole day and the next day my hair still looks pretty good. One thing that I don’t like is that it makes my scalp itchy. But I think that doesn’t happen to most people. Maybe I use too much of it or spray it too closely. (review)


I also swatched some of these for you. I have Revlon Colorstay foundation in the shade 150 Buff, Rimmel Stay Matte Pressed Powder in 001 Transparent, The Balm Mary Lou-Manizer, Milani Baked Blush in 05 Luminoso and MAC lipstick in Patisserie. 


I hope I cleared some of the hype for you and made your decision easier. Make sure to go to Mateja's blog and check out which 10 products she thinks are worth the hype. And don't forget to subscribe to her, if you don't follow her already.  

Let me know what you would add to this list. Maybe I'll get some ideas for further purchases. 

Pretty Leopard Makeup

$
0
0
Hey Beauties!

I am known for subtle wearable makeup and even when I think of theatrical makeup like Halloween, I still do something that can be wearable without some element. If I’m being completely honest I don’t think I have enough experience to do anything super artistic, because I know I wouldn’t be happy with the results. I also love this area of creative makeup all over social platforms and there’s been one look that I really wanted to do for a while. As you may know, I love leopard print on anything. So, I decided to do a pretty version of leopard makeup. It’s again very wearable and for those that would like to fit in the Halloween party, but don’t want to wear loads of makeup and masks. 


I have to apologize first, because I did my makeup before I started doing this look, so I just cleaned some of it off and started playing around. It was spur of the moment thing.  I started by applying light matte brown shade in the crease and also a bit at the sides of the nose, under my brows. Then I deepened it with darker matte brown. I used shimmery bronze brown all over the lid.


In the inner corner I used gold shimmery shade and spread it towards the center of the lid. I helped myself with scotch tape and drew my liner with dark matte shade. Then I went over it with black gel liner. 


I used black matte shade to darken outer edge, crease and that part where my nose starts. On the lower lash line I already had copper brown shimmery shade. I used matte black shade to connect lower lash line with my winged liner. 


After that you would do mascara and add some false lashes. They still look pretty natural, but give you more volume. You can use pretty dramatic ones, because this look can take it. 


At the side of my face I added leopard print. I used black gel liner and drew on leopard spots. Then I used medium matte brown eyeshadow and lightly applied it in the center of those leopard spots. 


As for the base I used high coverage foundation and concealer. Then I powdered it. I used shimmery warm bronzer and used it heavily around the outer edges of my face. I also contoured a little with contouring palette. I also contoured my nose, to get a bit of definition for my wild cat look. In place of highlighter and blush I used very shimmery yellow gold highlighter to bring together all those gold and brown shades, which I used in this look. 


Oh I also did my brows the usual way and then used brow gel to try to brush them up, for a more wild effect. Unfortunately the effect is not as pretty as it would be with someone that has naturally bushy strong brows.  On my lips I used classic cool toned res lipstick. You can end makeup here and you have a pretty classic makeup with leopard spots. 


But then I also added black nose and a line from that nose to my lips. I also made little spots where whiskers should be.  Just a basic touch so that drunk people on the party, will get that you are in fact representing leopard. If a cute guy mistakes you for a cat you should forgive him.  You know, seize the opportunity. 

That’s it for my version of a pretty leopard makeup. It’s easy and very wearable. I think anyone can do this. You don’t have to be precise with spots and everything else is just a basic makeup look. 


Face:
Revlon Colorstay foundation - 150 Buff
Catrice Liquid Camouflage concealer 010 Porcellain
Rimmel Stay Matte Pressed Powder - Transparent
The Balm Betty Lou-Manizer
Catrice Prime and Fine Contouring Palette- 010 Ashy Radiance
Freedom Makeup Pro Highlight - Glow

Eyes: 
Avon Ideal Flawless Eye Primer
Makeup Revolution Ultra Professional Eyeshadow - Flawless (Almost There)
Makeup Revolution Ultra Professional Eyeshadow - Flawless (Pure Chocolate)
I Heart Makeup Eyeshadow palette - Naked Chocolate (Frosted Choc)
Freedom Makeup Pro Highlight - Glow
Makeup Revolution Ultra Professional Eyeshadow - Flawless (Night)
Catrice Gel Eye Liner Waterproof - 010 Black Jack With Jack Black
Maybelline Lash Sensational Lash Multiplying mascara - Black
Born Pretty Store Fake eyelashes
Artdeco Adhesive for Lashes and Sparkles

Leopard print:
Catrice Gel Eye Liner Waterproof - 010 Black Jack With Jack Black
Makeup Revolution Ultra Professional Eyeshadow - Flawless (Smudge)

Nose: 
Catrice Gel Eye Liner Waterproof - 010 Black Jack With Jack Black
Catrice Liquid Liner - 010 Dating Joe Black 

Lips: 
Essence Lipliner - 10 Femme Fatale (old version)
MUD lipstick - Lady Bug

Review: Yazine Active Essence Lip Balm (shade 3)

$
0
0
Hey Beauties!

I got two more lip products from Born Pretty Store to review and here is the first one. It's from a brand Yazine and it's called Active Essence Lip Balm


It comes in a pretty plastic packaging with leaves. It contains 3.8 grams and costs 2.82$. You can buy it here.

It says that it has 98% of natural origin ingredients. It contains mountainous green tea essence for antioxidation and to resist harm from dry weather, fierce sun and cold wind and prevents pigmentation.  It also contains jojoba oil, shea butter and mint essence


I chose the shade 3, which looked the most orange to me. It’s actually a very light transparent peach. The texture is very smooth and silky. It glides on like one of those really smooth lip balms. Pigmentation is sheer as with most lip balms, but you can still build up to a pretty intense color for a lip balm. It’s very lightweight and would be perfect for something to throw into your bag and use it for whenever you need tad of color and some nourishment.


I wouldn’t say it substantially helped to moisturize my lips, but it did keep them in the condition that they were before. I also don’t smell that mint smell, that they promise. To me it just smells like a light vanilla. Very pleasant indeed. Obviously, it’s not long lasting, because of the sheer and smooth formula.

I will say that it does feel like a slight tingly sensation, but I'm not sure if it's just in my mind or if it is from that mint essence. 


I thought that this would be more of a pigmented product and not a lip balm, since it doesn’t say so on the Born Pretty Store title. It’s a good silky tinted lip balm. If I use lip balm, I go for the ones that are really buttery, thick and transparent. So, this might not be ideal match for me. I do find it good for someone who wants just a hint of color, but a nice smooth formula. It didn’t wow me, but it’s good.

If you want to get something from Born Pretty Store, you can use my code PETRAH10 and you'll get 10% off your order.


Review: Revlon Colorstay Combination/Oily Foundation (150 Buff)

$
0
0
Hey Beauties!

This has been long overdue. You know, when you have some products that are just so good that you take them for granted. This is why, I still haven’t written a proper review about my all-time favorite foundation Revlon Colorstay. Nonetheless, it’s here now. Prepare to be persuaded.


This foundation comes in a heavy glass bottle, like most drugstore foundations. The top is black and plastic. Packaging is actually very durable, so don’t panic if you drop it.

The prices are different among stores, but it’s usually around 12 or 13€ and you get 30 mlof it, which is also standard amount for drugstore foundations.


Here is the ingredients list. It also has SPF 15.


It has one flaw, which is the fact that it doesn’t have a pump. I’ve tried to find a good excuse for it, but can’t. It’s thick, but obviously not as thick that it wouldn’t go through pump. The pump is also not expensive, so Revlon’s only excuse is laziness.  Mateja has mention that standard pumps fit on Revlon bottle. So you can use pumps from Bourjois Healthy Mix or Rimmel foundations. I haven’t tried it yet, because I can work with it without the pump too. Because of the screw on top, the top of the bottle can get a bit dirty. It’s best to either pour some of it on your hand and then use the brush or sponge or if you like using hands, just put a finger over top and turn it upside down, then turn again to prevent spillage and you should be left with enough amount. 


Foundation is thicker, but  still very easy to spread.  It has a smooth and creamy feel, but it dries to a matte finish. The finish is not as matte as L'Oreal Infallible 24h-matte. It still looks "healthy" and moisturized. It’s not drying and it also doesn’t accentuate dry patches. Of course it depends on what moisturizer you use before, especially if you have dry skin. Keep in mind that I have combination to oily version. There’s also one for normal to dry skin. 


The drying depends from how thick your coats are, but in general it’s fast dryingfoundation (although not as fast as L’Oreal Infallable 24h-matte). If you have thinner layer it dries in a matter of second, while thicker coat needs more time to dry and it may be sticky for a longer time.

Once it’s dry it doesn’t move, at all. Seriously, the staying power is just amazing. It will literally last all day, if your skin is normal to dry. If you’re more on oily side, the long lastingness might me shorter, but still the best for a drugstore foundation.

It oxidizes a little, but I find that this depends from what I use underneath and how oily my skin gets through the day. If I use very hydrating creams, it doesn't seem to oxidize as much. It does oxidizes more in the summer time, when my skin produces more oil through the day. So I advise you to try some testers before, if you're afraid that the color will become too dark.


The coverage is fascinating. It can be thinned out to a light to medium coverage. Some would say that is full coverage foundation, but I would say that it’s medium to full coverage, although you can definitely build it up to full coverage. It might look a bit cakey by then. This foundation can cover everything from uneven skin tone, redness and small imperfections. If your skin is fairly good, you might not even need concealer after using this.

On the left side is how it looks like thinner out and on the right side is a very thick coat of foundation.


Application is crucial with this thicker high coverage foundation. Lately, brushes don’t seem to be working for me anymore. I hate how they leave stripes on my face. You get the most flawless and “natural” finish with makeup sponge. If you want to make it thinner, use a very moist sponge and tap on the face. If you want fuller coverage, squeeze excess moisture out of sponge and apply it by rolling onto the skin. This will cover pores and even out skin surface for flawless look. You can also use it with fingers, but this can result in a thinner coverage and maybe a bit less even.

I love the smell of it. It smells like a regular foundation smell, the ones that remind me of clay, but in a good way. The fact that it doesn’t have added perfumes is big plus for me and I’m sure sensitive skins will appreciate it, because it means less irritation. This is the only foundation that does not irritate me. Not that others do, but when my skin is hyper sensitive and irritated, foundations like Bourjois Healthy Mix further irritate my already sensitized skin with their added perfumes. 

On the left side I have no makeup and on the right side I have on Revlon Colorstay. As you can see the coverage is impressive.


I use the shade 150 Buff, which is the second lightest from the range. They also have Ivory, which is more pink toned and wouldn't suit me. Buff is slightly yellow toned, but still not as much as Bourjois Healthy Mix Foundation. So I find that this could work for neutral skin tones as well. It's definitely not the lightest, but it's light enough for most of the time. I will say in the winter this is a bit too dark for me and I have to mix it with white foundation. 

I also swatched it with some other foundations. L'Oreal True Match N1 Ivory is the lightest and it has more of a pink undertone. L'Oreal Infalible 24h-Matte 11 Vanilla is the darkest of them all and has that obvious pinkish orange undertone to it. Bourjois Healthy Mix in 51 Light Vanilla is the yellowest of them all and it's also the second lightest shade. Catrice Nude Illusion 010 Nude Ivory is very neutral and it's in the medium of lightness among these others. Revlon Colorstay in 150 Buff is also pretty yellow toned and fairly light, although it does oxidizes a little. 


This is how my skin looks like just with Revlon Colorstay. I didn't use any powder on top.


When I put on top all my powders, bronzers, highlighters and blushes, it looks pretty much flawless. I hope you can now understand why I love it so much.


Impeccable high coverage, matte finish (that almost doesn't require powder, but doesn't look drying), neutral to warm undertone and amazing staying power, is why I love it so much. This is definitely my holy grail foundation and I'm going to be repurchasing it time and time again.  

If you have normal/dry version, I would love to hear how is it different to  my combination/oily one. 

Review: The Hot Shop Lip Crayon (shade 10)

$
0
0
Hey Beauties!

Today it's another review of a Born Pretty Store product. It' called The Hot Shop Lip Crayon. The Hot Shop seems to be copying brand Top Shop. I already reviewed one of their The Hot Shop lipsticks and I loved it. The formula was amazing. So I decided to also try this lip crayon version.


It comes in a pretty matte plastic mint crayon shape with plastic transparent lid. On the bottom it has a cute dots design. It looks like a giant crayon. The price for it is 4.17$ and you get 3.8 grams. You can buy it here.


It's that type of crayon, that you just twist and it comes up. It doesn't require any sharpening. 


I chose the shade 10, because it was most neutral to me. Unfortunately I didn’t pay much attention to the shop swatches, because I thought it doesn’t have any shimmer in it.

It’s a peach shade with brown undertone and it has small gold shimmer, which I hope you can see on the photo. 


The lip crayon is pretty pigmented.  Formula is very smooth and glides on effortlessly. It also doesn’t feel sticky, but also not creamy as most lipsticks. It’s very lightweight formula for something that looks like lipstick. If you apply a lot of it, it can get a bit patchy and looks overdone. It’s not the best formula for when you have dry patches, because it does accentuate them. I find it like a mix between a lip balm and lipstick.

Shimmer in it looks tiny on the swatches and makes lips look really pretty, but I hate that when the shade starts to wear off, you’re left with chunks of pretty big glitter on your lips. It looks like a Christmas tree, definitely not pretty. It's not the most long lasting product, but it's also not like lip balm. 


It has no smell. 


It’s a very smooth and well pigmented lip crayon. The formula is good, I like the shade of it, but the glitter in it is off-putting. I wish I would have chosen something with no shimmer. I would probably like it more. But because of that glitter chunks, I don’t even want to wear it. So I advise you to look closely at their swatches and choose the one with no shimmer. 


If this sparked interest in you, go to Born Pretty Store and check out what they're offering. If you decide to purchase something, use my code PETRAH10 and you'll get 10 % off


Review: The Balm Betty-Lou Manizer aka "The Bronzing Bandit"

$
0
0
Hey Beauties!

The Balm is a very well-known brand that has produced some cult beauty products. Their Mary-Lou Manizer is very popular highlighter and actually my all-time favorite. They’re also very known for their Bahama Mama bronzer, all of their eyeshadow palettes (Mateja reviewed Nude’tude) and many of their pretty blushes. They really have a lot of popular and loved products. And now they're finally in Slovenia (mislim, da so zaenkrat na voljo v Müller Celje in Rudnik Ljubljana). You can imagine, I was more than excited, when they asked me if I wanted to review some of their products. 


The beauty of The Balm products is that they like to emphasize how multi-purpose their products are. You’ll see they write multiple uses for each of their products. Betty-Lou Manizer can be used as bronzer as well as eyeshadow. I have to admit, that I first thought all of their Manizers were highlighters, when in fact Betty is more of a bronzer, at least on fair to medium skin tones. It can be used as a subtle highlighter on dark skin tones.

It comes in their cute retro packaging. I can see why they wanted to brand these as wanted, because once you see them, you’ll want them all. The pretty design features tanned Betty girl, who’s apparently wanted and it’s called The Bronzing Bandit. The packaging is plastic silver and well made. You get 8.5 grams of product and the price in Slovenia is around 24€, which is comparable to the prices in other online shops like Feelunique. 


The ingredients list.


You also get a good sized mirror, so you can touch up your sun glow on the go. 


The shade is very yellow/gold based warm brown. It has a very obvious yellow almost orange undertone, which might not be for everyone.  I feel like there’s so much being said about bronzer and how they should be more cool toned and the fact that you don’t want that orange undertone, when in fact that undertone can look really nice on warm skin tones. Grey based and pink based bronzers are better for cooler skin tones, while warm skin tones will benefit more from a warmer, more gold toned bronzer, because it will look more natural with their skin tone. Saying that the orange undertone in Betty is very obvious, so keep that in mind.

It also gives you a bit of sheen, which is not at all like shimmer or as shiny as Mary-Lou Manizer, but I just needed to point it out for all of those that want matte bronzers. Matte bronzers provide you with more depth to your face and you can use them to contour, while those with a bit of sheen make you look very healthy glowy. Betty is just that. It gives you that bronzed sun glow. The shade seems quite strong and dark, but is actually perfect for fair skins. If you put it on sheer, it gives you just a bit of warm color. You can obviously build it up to a more intense color, but it all depends on your preference and how dark your skin is. 

The texture is on the dry side. It’s very pigmented, but you can slowly build up the intensity. It’s also very easy to blend.


Here I have on foundation, concealer and powder. 


And this is how it looks like, when I add Betty-Lou Manizer.  As you can see it just gives me a bit of warmth and definition.  I hope you can also see how fair this can look on my already very light skin tone. It gives me a bit of sheen, which is comparable to a more dewy foundation and not at all shimmer or highlighter. 


I also compared it with some of my other bronzers to give you a bit of comparison. Betty-Lou Manizer is the most shiny of them all and it has the most obvious yellow gold undertone. Elf's Contouring Blush and Bronzing Powder in St, Lucia also has shiny bronzer, but the sheen is less obvious. The shade is darker and more on the brown side. My favorite matte bronzer is from Makeup Revolution Ultra Sculpt and Contour Kit in Ultra Fair C01. This bronzer is again warm toned, but a very fair shade. It's comparable to Betty, but the shade is a bit less yellow toned. Catrice Sun Matt Bronzing Powder in 030 Medium Bronze has that orange undertone and it's also fairly light. 


I also compared Betty-Lou Manizer to Mary-Lou Manizer. As you can see both are shiny, but I still have a feeling that Betty is less shiny - it might be because of the darker shade. None of them have any visible shimmer in it, which is what makes them so pretty. It's just the sheen that gives you that popular glow. 


The combination of two gives you a very shiny cheeks with a bit of depth, warmth and a lot of shiny highlight. Ever since I got Betty, I've been wearing it with every makeup look. 


Betty-Lou Manizer has easily become my favorite shiny bronzer. It has a very yellow warm undertone, which warms up my yellow toned complexion. I love the fact that despite being very pigmented, it can be sheered out or built up. I like the glowy sheen that it gives to my skin, especially in these dull cold days. I just really like it. But I feel like a lot of people with cooler skin tones might totally disagree with me. I can't say that for a fact, so maybe test it before you buy it. 

These two Manizer sisters really impressed me. As you know they also have Cindy-Lou Manizer, which is more of a pink toned highlight aka blush. I secretly want it, even though I know it's not exactly my color. I just want the whole gang at one place. For those of you with pinkish undertones it would be perfect. The Balm also came out with theManizers Sisters a palette where you can find all of those amazing shiny goodness in one palette.

Products that also cut my eye are their Meet Matt(e) Hughes Long-Lasting Liquid Lipsticks. I especially like Loyal, a deep red and Charming, pretty mauve shade. Their wittily named eyeshadow palettes are all gorgeous and I love how they sometimes make palettes with multiple products like In theBalm of Your Hand Holiday Face Palette, where you get all of their best face products at one place. 

I still have a review of one of their products for you and it's their concealer. Stay tuned for that ;).

Review: Freedom Makeup Conceal Palette Pro Light vs. Makeup Revolution Ultra Cover and Conceal Palette Light

$
0
0
Hey Beauties!

A while ago a lot of Slovenian bloggers got some new products from Freedom Makeup (from Licila.si), which is a new brand (basically the same as Makeup Revolution – I suspect it’s all the same company Makeup Revolution, I Heart Makeup and Freedom Makeup).  I got their lipstick, highlighter and concealer palette and since I already own Makeup Revolution palette, but I didn’t write a review yet, I decided to compare them. 


They both have the same shiny black plastic packaging and full sized mirror. Freedom Makeup Conceal Palette Pro Light (buy here) looks smaller, but you get more product – 12 grams. Makeup Revolution Ultra Cover and Conceal Palette Light (buy here) is bigger, has smaller circles and the total amount you get is 10 grams. Both cost the same 8.95€


In the Freedom Makeup concealer palette you get 6 shades. Despite being called light, I can only see two shades as light and those are the first ones from the left on the top half. The first one from the left on the bottom is yellow toned, while other three are already too dark for my skin tone. 


The shades from left to right from top to bottom.

1: the lightest whitish nude based
2: light peach based
3: dark orange based, almost brown
4: yellow whitish based
5: medium peach based
6: medium orange based


In the Makeup Revolution palette you get 8 shades. The six shades are exactly the same as the ones in the Freedom palette. There are two additional shades, which are on the darker side, one is in fact almost a bronzer on my skin tone. 


The shades from left to right from top to bottom. 

1: the same as shade 1 from Freedom Makeup
2: the same as shade 2 from Freedom Makeup
3: the same as shade 3 from Freedom Makeup
4: pink based medium to dark, almost brown
5: the same as shade 4 from Freedom Makeup
6: the same as shade 5 from Freedom Makeup
7: the same as shade 6 from Freedom Makeup
8: very orange based medium to brown (bronzer)


As you can see, when I compare these shades they are all the same, except the last ones on the right side on the top and the bottom in Makeup Revolution palette. Those are two additional shades, that you don't find in the Freedom palette. They are also pretty dark, so I think they're unnecessary in the palette called Light.


Both formulas seem exactly the same. Concealers are very buttery to the point of being greasy. The pigmentation is not all that. I find the coverage to be light to medium. I like my concealers to be medium or full coverage, since concealer is something you use on top of foundation to conceal what foundation can't. These feel more like a cream foundation to me. 

Once they touch the skin they do tend to dry fairy quick. It all depend on what you have underneath. If you have moisturizer then concealer will look shiny on top, otherwise it can even be a bit drying. You need to set it. It goes into fine lines, which I hate. Especially through the day, it gets even more obvious. 

The concealers tend to wear off through the day and they are definitely not long lasting. It's more like a light coverage for those that don't really need much to cover. 

I tried to show you how it looks like underneath my eyes. The coverage is pretty light, unless you build it up to a light to medium. You can't really cover red patches or pimples. It's just not thick or pigmented enough. 


I bought Makeup Revolution palette because I wanted to use it, when I do makeup on others. But since the concealers feel more like a cream foundation, I use them for contouring and highlighting underneath foundation. Here I wanted to show you how I used dark almost bronzy concealer shades to contour and the lighter whitish shade as a highlight. 


On my right side of the face I used Freedom Makeup palette and on my left side I used Makeup Revolution palette. 


Once you blend these and set with powder, you can in fact get that 3D face and it does act as a light foundation. Any bigger imperfections you will need to conceal with other products. 


I hope you can see how concealer emphasizes fine lines and in time it also gets into those lines, which is very unattractive. 


This is how it looks like once, I put concealer as a contour and highlight underneath my foundation and then I also put some on top, to get the maximum effect. Of course I also set contours and highlights with powder products on top. 


Obviously this is not your everyday makeup routine. This sort of technique is reserved for events where you'll take a lot of pictures, because the heavy contour and highlight brings your face some dimension. This is especially useful in flash photography, where a lot of color is lost and dragged out from your face, because of the harsh light. 


Makeup Revolution was first and then they decided to add another makeup line called Freedom Makeup. Basically those are the exact same products with a different name. The shade range is exactly the same. Only difference is that Makeup Revolution has two additional shades, which are more on the medium to dark side. So if you're fair there's not much that you can do with it. Freedom Makeup also has more product. despite being smaller and more compact (12 grams).

You can use these as cream foundations for contouring and highlighting, if you don't have any fine lines or try to avoid those areas. The concealers as such are not pigmented enough and they also don't last a long time. Yes, you get the wider shade range, but to be honest most of the shades are already too dark for my skin tone. If you're very fair, you won't get much from this shade range. None of the products impressed me. 

If you wan to buy any of the Freedom Makeup products, you can use code FREEDOM15 and you'll get 15% off your Freedom Makeup order on licila.si. The code is valid until the end of October. 

Dos and don'ts of makeup

$
0
0
Hey Beauties!

I often get a bit different post ideas, but rarely act on them. All the reviews and makeup looks just get in the way and then I forget all about it. Since I have more time right now, I can finally write posts that I feel passionate about and are not necessary reviews. 

Today I’ll talk about what you should and shouldn’t do when it comes to makeup. Let me just clear something out. No, I am not a certified makeup artist and I didn’t do this post to offend anyone. I decided to do this to help others maybe change some of the things that they do and are not always the best. Of course, that is just my personal opinion and you may think some of those things actually look really good. That’s fine. It’s just makeup, as Wayne Goss says. You can take it off and begin again. People have different opinions and different styles. This is just what I think most people notice as being wrong.


Base

This is the first and most important part of any makeup. A lot of people forget about it. Moisturizer or primer is an essential part of how your foundation is going to look. We all have different skin types and we should have according moisturizers. I change them during seasons and based on what foundation I’ll be using on top of it. If you have dry skin, you should definitely put on moisturizing creams, because otherwise foundation may cling to dry patches and just looks very dull. If you have oilier skin, go for something more matifying or whatever you find that suits your skin best. If your skin has enough moisture, you can skip moisturizer and just go with primer. Primer is not a must have, unless you like it. You can just use face cream and it can work just as fine it all depends on your skin needs. 


Foundation

You should also use the right type of foundation for your skin type, but it is not as important as moisturizers. I think that you can use very matte foundation, even if you have dry skin, if you use proper skin care before and make sure that your skin is in the best condition. 

Choosing the right shade is crucial. You should know what your skin’s undertone is. You could be cool toned, warm toned or neutral. There are a lot of different ways to figure that out, so I’ll advise you to google it. Then you should choose the right shade according to your skin. One of the worst things is when you have too dark foundation. I think you can get away with lighter shades, but darker is worse. Most people tend to wear too dark foundations. Honestly, it’s not all their fault. Our drugstores have the worst shade selection ever. Almost all of them are too dark for most people. It’s one of the most frustrating things ever. Certain brands carry white foundations, which you can mix with your regular foundation and make it lighter. You can get away with a shade or two darker foundations, but for the love of makeup, blend it onto your neck. Foundation line on the jaw is still a no no. 

For more information watch the video Choosing the Right Shade of Foundation by Lisa Eldridge. 

You can even skip foundation, if your skin is really nice. There is no need to wear foundation if you don’t need it. You should also consider that foundation is for evening out your skin tone and getting rid of slight redness and such. It is not going to cover imperfections. For that you should still use concealer.


Concealer

Obviously there are concealers and correctors. Concealers are usually the same shade as foundations and have higher coverage. While correctors have colors like salmon, pink, green, yellow and are used to correct undertones in your skin. For example, if you have red patches or red pimples, you can correct that redness with green corrector. Because these shades together neutralize each other. I am more of a concealer kind of girl. You should have similar shade of concealer to your foundation. You can use lighter if you want to also highlight some parts, like under eye area or darker, if you want to contour with it. But usually it’s best to use the similar shade to your foundation.

Too much concealer can make your makeup look very cakey and unflattering. I don’t know how some of those makeup gurus get away with wearing so much concealer underneath their eyes. It looks very unflattering, flat, cakey and gross on me. I am a believer of applying little and adding more if you actually need it. It’s also best to just use higher coverage concealer and not pile so much of it on. Especially on the under eye area, it can quickly settle into fine lines. For imperfections around your face, like pimples, patches and such, you should always use pinpoint concealing method. This means that you get very small brush and apply concealer only to the area that needs it. This way you’ll have higher coverage only on that particular part of your face and not all over it. It will look fresher and more natural. 

Powder

This step is optional. I need it, but some may not. It depends on your skin and foundation. If your skin is dry and you don’t get oily through the day, you obviously don’t need it, unless you want to have another colored layer on top. If you don’t like dewy finish of foundation or know that it will start smudging all over your face in a couple of hours, then use it, because it may help keep your makeup nice for longer. You can choose among colored powders or use transparent shades, which are usually suited more for fair skins and don't add any additional color. 


Eye Primer

This is also optional step. It’s not necessary to use, but it can help you a lot. It makes your eyeshadow last longer, makes it look more intense and evens out your skin tone, if you have darkness or capillaries around that area. You can already see the difference on the photo. On the left side I used eye primer and my skin is a lot more even. 

Eyeshadow

I feel like most of makeup mistakes, happen in this phase. Most of people still don’t know how to make the best out of their eye shape. It also has a lot to do with bad practices from the past. We’ve all learned from metallic silver eyeshadows all over hooded eyes and the horrible one shade of blue eyeshadow. 

There is million ways in how you can combine eyeshadows and what suits certain eye shapes and so on. There are some important general rules for applying eye makeup.

Eyeshadow should always be blended. Applying a patch of eyeshadow on the center of your lid and thinking that’s it, is wrong. You should always blend it. Eyeshadow should be more intense towards the center and should bleed into nothing coming to the outer parts of the eye. There shouldn’t be any visible lines as to where eyeshadow starts and where it ends.

Here’s one advice for those with hooded eyes. As you can see mine are slightly hooded, but not entirely. Your eyeshadow will look much prettier, if you blend it above your crease towards the brows. No, I don’t mean apply it all the way up to the brows, but just don’t stop in the crease. Because once you’ll look straight up, you won’t even see the eyeshadow. So go a bit above it to tie it together with the eyeshadow on your mobile lid, which will be seen when you look down.

Wayne Goss has a lot of tutorials on how to apply eyeshadows to hooded eyes. I just wanted to show you one that explains all the basics. 

Also don’t use dark eyeshadows in the inner corner of your eye, because this area is already darker because of the eye shape and shadows. This excludes those with wide apart eyes. You can actually use darker shades in that part, to optically bring eyes a bit closer. But for most people, it’s not flattering. As you can see on my photo, on the left I blended eyeshadow and put it a bit above crease and on the right I didn’t blend it and I used it also in the inner corner of my eye.

One of the mistakes that most people do is that they apply eyeshadow too low in their outer corner. You should always go up, because it lifts up your entire face. If you go too down, it just makes your face look saggy and your eyes sad.

Now let’s talk about highlighting the brow bone. I think this looks good on certain eyes, which have a lot of eyelid space. It’s an absolute death for hooded eyes. If you apply shimmery light eyeshadow on your brow bone, it will just accentuate that part and make it look even more hooded. You can get away with using matte shades and applying them just to the very arch under your brow and don’t drag it too down. It may look even better if you highlight above the arch of your brows.


Eyeliner

Ta ta ta taaam. I know it’s one of the scariest steps in doing your makeup. I won’t pretend like mine is always on fleek, because it’s not. It’s a hard thing to get it right and you should practice it a lot. Practice makes perfect. You can’t say oh I don’t know how to do eyeliner. You’ve probably tried it what, four or five times? That’s nothing. After you’ll apply it fifty times, then you can say you don’t know how to do eyeliner. But I guarantee you by then, you’ll know how to make it descent. It helps if you apply it with short strokes starting from inside. You can't expect to draw it in one swipe. If you can, kudos to you - you have one fan here (me). I thought about doing a separate post on my eye liner technique, so I won’t go into those details.

As far as the looks of eyeliner, it looks best if it’s thinner on the inside of your eye and thicker towards the outer corner. If you have hooded eyes, it should be a lot thinner, you can even tight line your eyes. You can go thicker, if you have a lot of lid showing, when you’re looking straight forward. I personally don’t like when someone does very thick eyeliner, because I think it just closes eyes and cuts the crease in an unflattering way.

As far as winged liner goes, you should always point wing upwards, never ever make it down. This will again make your eyes look sad. Just practice and find that angle that suits your eye shape. If you have hooded eye, your wing obviously won’t look pretty, if it’s at a very high angle, because your hooded eye will break the line of your eyeliner. It’s best if you do a slight angle and still make all the eyeliner visible. I hope you understand what I’m trying to say.  


Brows

Brows have really been getting more and more attention these few years. It’s said that brows are frames to our eyes and you should frame your eyes nicely. This category may not even be a step for some of you, who have thick and dark brows, lucky you. As for us, that have sparse and light brows, we should definitely pay some attention to it. You can use eye pencil, gels and powders to fill them in. It all depends on how bold you like your brows.

What I think looks unflattering is making them too dark. I think brows are one of those parts of makeup that looks best natural. I don’t like when people with black hair use black gels to entirely fill in their brows. It can look a bit like an evil queen from Disney. You know what I mean. I think they’re called Instagram brows. It’s that brow that looks like you outlined it and then filled it in like a coloring. It’s too harsh and only looks nice on very little people. Never go too dark or too filled in with brows. At least that is my preference. Light feathery strokes and still showing through texture of your brows, looks more natural.

Mascara

Some people take their mascara, apply one coat, maybe concentrate more on the ends of the lashes and they call it a day. Wrong. First thing that may change your mascara application is wiping off the brush. Especially when you get new mascara, it has way too much product on. It will just stick your lashes together and make it look all spidery.

Then when you’re applying it, you should go really close to the roots of the lashes and really make it darker here. Then you can zig zag it up to the ends of the lashes. One coat usually doesn’t do much, so you should go back for as much coats as your lashes allow. Too much means you’ll get sticky lashes, too little results in no volume and no definition. If you’re lashes are super stubborn, use a separate mini comb for lashes to comb through them and separate them for more definition. 


Contour

Never do line under your cheek bone. Just like with eyeshadow, blend it. It’s best to blend contour upwards and use fluffier, yet defining brush to get the perfect shadow effect. You usually contour under cheek bone, around nose, around the edges of forehead and along the jaw line but it all depends on what your trying to make recede

Also chose the shade that imitates natural shadow. Too grey can look too dark and dead, while too brown can look like mud on your face. Also don’t make it too dark, because the whole point of it is to still look like a natural shadow to slightly define your face contours. Forget what you saw on Kim Kardashian, she films all day and has 20 flashes pointing at her whenever she goes out. You on the other hand live in daylight and anything too much will be very noticeable. 

Highlighter

Highlighter is a great way of adding some glow and dew to only those parts that you want to. It can make you look fresh and younger. The most common place to put it is on tops of your cheeks, close to eyes. If you have larger pores, you should avoid applying it on those parts of your face, which is usually more towards the nose. Highlighter will make those pores even more visible, which is not what you want. You can also apply it on the bridge of the nose, on the Cupid’s bow above your lip, on top of your brow arch and chin. It all depends on your preference and what you want to highlight.

Choosing the right shade means nothing too dark or too light, which can look very stark. Also make sure that the shimmer in it is just big enough to give you that glow, but not make you look like you played with glitter with your 4-year old cousin.

Blush

Shade wise, you should experiment with what looks best on your skin tone. But as far as application goes, you should be light-handed. You can always add more, but it’s harder to take it off, if you’ve applied too much. There’s nothing worse than looking like Marie Antoinette or clown.

Some like to apply it more towards the temples, to make it like a contour and some like to apply it on the very apples of the cheeks, in the center. Apples of the cheeks pop out only when you smile, so if your apples tend to drop when you’re serious, you may not be doing a favor to yourself. It’s best to apply it in an upwards motion to pull the face up. But that obviously depends on your face shape, so experiment. I prefer to use it in between my contour and highlighter also pulling towards the ear.

Bronzer

It’s one of the most underestimated products that most people don’t use. For all of those that apply too dark foundation with the excuse that they want to look darker, you should use bronzer instead. Bronzer is the one product that you can get away with, if it’s darker. You just need to properly blend it. It can give you that natural summer tan and it gives your face a 3D dimension, if you use ti in the right places. It can bright up your complexion and make it warmer. I love bronzer and never do a look without it. I’m pretty pale, so bronzer gives me that sun kissed skin and makes my face features a tad darker and 3D looking. It’s the best way to add color to your skin tone.

It’s best to concentrate it on the outer parts of your face or use it lightly all over in summer days, to accentuate the sun tan, that you’ve caught accidentally. You can use shimmery bronzers to really give you that summer glow or stick with matte ones, to help you contour your face. Bronzer is also amazing for making your face slightly optically thinner, if you apply it on the outer parts of the face. 


Lipstick

I think we’re passed look-at-me-I-look-like-I’m-dead lipstick phase, but just in case someone’s still using it, don’t. A few years ago it was popular to use either very light shades of lipsticks or concealer as a lipstick. Those lighter than your skin tone shades make you look like you’re dead. It drains all the color from your face and does nothing for your lips. So please, avoid it.

It is crucial that you choose the right nude lipsticks for your skin type. Lisa Eldridge has a fabulous video explaining you on how to find the right nude lipstick for you.


Overdrawing your lips is another “popular” thing right now. It all became very popular with Kylie Jenner. You can absolutely overdraw your lips you just need to know how. First of all you can’t go too overboard. You can draw lip line on the outer part of your natural lip line, but if you’ll go too over it, it will look bad. When you’re overdrawing matte lip products look better, because they flatten your natural lip line and therefore make it look like it isn’t there. You can go a bit over your line on the center of your lips, but go more towards your natural lip line as you come to lip corners. This will give your lips pout, but not make you look like Joker. 


Lip liner

Your lip liner and lipstick should be close in the shade department. Don’t use dark lip liners and light lipsticks, it will make you look like a certain stereotype of the ladies of the night (know what I mean?). It doesn’t have to be exact same color, but just use similar shades or don’t use them at all. Of course now there's more and more contrasts between lip liner and lipstick with techniques like ombre lips, but this should be done carefully and well blended. 

Lip liner is best paired with dark lipsticks, because you can get a more precise line with lip liner and dark lipsticks are less forgiving than lighter ones.


You can slap on that nude shade and no one will really look at it closely or pay attention to mistakes. But when you use dark shades of lipsticks, make sure that the application is even and that edges are well blended. There’s nothing worse than an uneven layer of lipstick. It just makes you look sloppy. If it’s hard for you to apply it straight from the bullet, well use a brush. A brush can make you help draw that precise line around the edges.


This is all that I came up with for now. I know, it's already a lot. Makeup is a profession and a lot of people study it and use different techniques to get the most flawless makeup application. If you just want to look nice with natural makeup, I hope my tips helped you. 

Obviously rules are to be broken and by no means I'm trying to say that you should follow any kind of rules. This is just a guideline as to what I think looks nice and what I think looks flattering on most people. But you do, what makes you happy, because makeup should always make you happy. Don't stress about it, just have fun with it. It's here to make your life a bit more colorful and happier. 

Marsala Inspired Makeup

$
0
0
Hey Beauties!

Pantone every year chooses the color of the year. This year it's Marsala. It's named after wine and it has gorgeous red-brown base. This shade is easily translated into autumn. That's why I decided to do Marsala inspired makeup. 


I started my eye makeup with neutral flesh toned base and then I added chocolate brown into the crease. I used dark red shade all over the lid and blended it into the crease. 


On the lower lid I wanted another pop of color so I used dark purple, almost brown. I used the same chocolate brown just at the very outside corner. White shadow was use to highlight the inner corner of the eye.


I'm sorry for my horrible liner. I am at a point when all my eyeliners are drying out, so I barely have any to work with. I also added volumizing and lengthening mascara. 


On my face I used foundation, concealer and powder. I used warm shimmery bronzer and gold based highlighter. I also used a bit of contour under my cheeks. For the blush I went for something berry mauve. 

I mixed bunch of lipsticks together to get the wanted brown based red shade. It actually looks lighter on the photos. 


Marsala is totally my kind of autumn color and I actually use such shades in my daily routine. Red can sometimes be too harsh and sick like, but this Marsala hue is more like wine and anyone can pull it off. My look is very simple and quite quick to recreate. Would you include Marsala in your makeup look?


Products used

Face:
Catrice Nude Illusion foundation - 010 Nude Ivory
The Balm Concealer - Light
Elf HD Powder - Sheer
The Balm Betty-Lou Manizer (bronzer)
The Balm Mary-Lou Manizer
Catrice Prime and Fine Professional Contouring Palette - 010 Ashy Radiance
Catrice Illuminating Blush - 010 I Am Nuts About You

Eyes:
Avon Ideal Flawless eye primer - Light Beige
Sleek I-Divine Ultra Matts V2 eyeshadow palette - Dune
Sleek I-Divine Ultra Matts V2 eyeshadow palette - Paper Bag
Sleek I-Divine Ultra Matts V2 eyeshadow palette - Maple
Sleek I-Divine Ultra Matts V2 eyeshadow palette - Villan
Sleek I-Divine Ultra Matts V2 eyeshadow palette - Pillow Talk
Farmasi Kajal Secret Eyeliner Pen
Avon Big and False Lash Volume Mascara - Black

Lips:
Essence Lipliner 11 In The Nude
Avon 3D Plumping Lipstick - Divine Wine
Avon 3D Plumping Lipstick - Twig
NYX Matte Lipstick - Alabama

Fairy of Gold

$
0
0
Hey Beauties!

I recently saw some pretty metal  gold leafs in one of the stores (Tedi) and after seeing Tatjana's photo of her Greek Goddess look, I needed to do something gold inspired. Halloween is closer and closer and I'm still getting some inspiration for pretty makeup looks, so I'll probably post some more this week.


I decided to call it Fairy of Gold for the obvious reasons. The look includes a lot of gold and sparkling gold leafs look like something that fairy would carry around. 

I started with my foundation, concealer and powder. Then I used orange based shimmery bronzer and heavily contoured all around my face. I used champagne shimmery highlighter and highlighted my cheeks, tops of cheeks, forehead, nose, Cupid's bow and chin. It's all about the glow with fairy.


On my eyes I started with matte light brown in the crease. After that I darkened the outer edge with matte dark brown. I used very shimmery gold copper eyeshadow all around the lid and in the inner corner of the eye.


With eyeliner I did a double wing and added some additional wing at the bottom of the eye. I also lined the lower lash line with black gel liner. Then I used gold metal leafs and glued them on the lid. It will give you crackled effect, but also a pop of light when you'll look down.


I also added some false lashes and mascara over the top. I filled in my brows as usual and then added some of the bronzed shimmery eyeliner as well as some gold sparkly eyeliner on tops of brow hair. 


I also used bronzed shimmery eyeliner to create some design at the sides of my eyes as well as on the forehead. The gold leafs were also added under the eyes on the cheeks. Underneath I also added some small gold shimmer. It's just a lot of shimmer in this look - go crazy. This is your ultimate highlight look. 


I also added some gold star in between my brows. On my lips I used a very pale peach liner. I went over it with peach lip balm and added small gold shimmer.


Being a highlighter freak you can imagine how happy I was with all that gold shimmer on me. It looks like a bathe in it and I'm not ashamed. This is definitely my kind of pretty masquerade or even Halloween party look. 


Products used

Face:
Revlon Colorstay Foundation - 150 Buff
Catrice Vlevet Finish Concealer With Hyaluron - 030 Velvet Beige
Rimmel Stay Matte Pressed Powder - Transparent
The Balm Betty-Lou Manizer
The Balm Mary-Lou Manizer
Catrice Prime and Fine Professional Contouring Palette - 010 Ashy Radiance
Tedi Gold Metal Leafs
Essence LE Beach Cruisers Waterproof Liquid Eyeliner - 01 Sun, Fun and Copper!
Kik Gold Stars Decoration

Brows
Born Pretty Store Brow and Nose Powder
Essence LE Beach Cruisers Waterproof Liquid Eyeliner - 01 Sun, Fun and Copper!
Stargazer Glitter Eyeliner - Gold
Catrice LE Glamazona Liquid Gold Topper - C01 Jungle Treasure

Eyes:
Avon Ideal Flawless Eyeshadow Primer
Makeup Revolution Ultra Professional Eyeshadow - Flawless (Smudge)
Makeup Revolution Ultra Professional Eyeshadow - Flawless (Pure Chocolate)
Essence 3D Eyeshadow - 08 Irresistible Vanilla Latte
Essence Eyeliner Pen Waterproof - 01
Avon Supershock Gel eyeliner - Black
Elf Makeup Lock and Seal
Bubu Girl Wow Painting Lip Tint
Tedi Gold Metal Leafs
Born Pretty Store False Lashes
Artdeco Adhesive for Lashes and Sparkles
Maybelline Lash Sensational Lash Multiplying Mascara - Black

Lips:
Terra Naturi Lipliner - 03 So Nude
Yazine Active Essence Lip Balm - 3
Catrice LE Glamazona Liquid Gold Topper - C01 Jungle Treasure

Romantic Siren

$
0
0
Hey Beauties!

A few days ago I got a wonderful package from Avon cosmetics - see here. As soon as I got my hands on their Supershock Vivid Liquid Eye Shadows I had an idea to use them in this look. The look was inspired by Kiko's Limited Edition called Midnight Siren. I wanted to use liquid eye shadows to create hypnotizing inviting gaze that sirens should embody. Sirens are mythological beings of the sea. They were said to be beautiful and lured nearby sailors with their music and voices to shipwreck. I find that very interesting and a great idea to recreate for masquerade or Halloween events, if you want to go with something more subtle and romantic. 

I always say that my makeup looks are simple, but this really is. Anyone can do this, no excuses.


I used 7 shades of Avon Supershock Vivid Liquid Eye Shadows. You can use cream eyeshadows or just go with metallic or shimmery powder eyeshadows. It's more about the shades, although I love the metallic effect of these liquid ones. 

I started by applying stark blue silver shadow into the inner corner of the eye. I added light pink a bit more towards the lid. Then I used dark violet in the first part of the lid and left some space in the center. I moved on to the outer part of the eye and used emerald green. I also connected it to the bottom lash line. Then I used gold based olive green in the center. I also added a bit of burgundy shade in the crease to connect dark violet and emerald. I used the same shades on the bottom. 

I didn't really blend these out, because I wanted to keep the intensity. The whole look is more like a painting technique and it's just a lot of shades with metallic finish put on one lid. The messier the better in my opinion. 


I skipped the liner. Instead I used fluttery long natural false lashes and applied them close to the lash line. I put on some mascara and eyes are done. 


For the sake of this being a bit more shimmery and hypnotizing, I also used some nail rhinestones and glued them under the arch of the brows and around the outer corner of the eye. I also used one small one in the inner corner of the eye, to make them pop.  


I used the same liquid eyeshadows on my lips. First I used the emerald green one all over the lips. I also added stark blue silver in the very center of the eye, which created a little ombre. 

You can use cream eyeshadows or lipsticks and go over them with silver and blue powder eyeshadows.


On my face I used foundation, concealer and powder. I also used cream light gold highlighter and heavily highlighted cheeks, on top of brows, nose, Cupid's bow and chin. I went over it with silver powder eyeshadow to intensify it. I used blue shimmery powder eyeshadow to contour sides of my face and nose. I also went over contours and highlights with emerald and silver liquid eyeshadows. Just to get the same color all around the face. 


If you decided to recreate this, you can also wet your hair for a better effect. You can even use oil on your hair. It will give you the same wet effect plus you'll be giving yourself an oil mask for the whole evening - two in one. 


Products used

Face:
Catrice Nude Illusion Foundation - 010 Nude Ivory
Catrice Velvet Finish Concealer - 030 Velvet Beige
Rimmel Stay Matte Pressed Powder - Transparent
Essence Soo Glow Cream To Powder Highlighter - 10 Look On The Bright Side
Catrice Prime and Fine Professional Contouring Palette - 010 Ashy Radiance
Avon Supershock Vivid Liquid Eye Shadow - Sparkling Platinum
Avon Supershock Vivid Liquid Eye Shadow - Electric Emerald
Coastal Scents 88 Shimmer Eyeshadow Palette - silver and blue eyeshadows

Eyes:
Avon Ideal Flawless Eyeshadow Primer
Avon Supershock Vivid Liquid Eye Shadow - Sparkling Platinum
Avon Supershock Vivid Liquid Eye Shadow - Pink Party
Avon Supershock Vivid Liquid Eye Shadow - Lilac Lightning
Avon Supershock Vivid Liquid Eye Shadow - Electric Emerald
Avon Supershock Vivid Liquid Eye Shadow - 24K Gold
Avon Supershock Vivid Liquid Eye Shadow - Chrimson Thrill
Born Pretty Store False lashes
Artdeco Adhesive fro Lashes and Sparkles
Maybelline Lash Sensational Lash Multiplying Mascara - Black

Lips:
Avon 3D Plumping Lipstick - Stolen Kisses
Avon Supershock Vivid Liquid Eye Shadow - Electric Emerald
Avon Supershock Vivid Liquid Eye Shadow - Sparkling Platinum
Viewing all 803 articles
Browse latest View live